
Copilot sits in your taskbar. Recall wants to screenshot what you do. Paint nudges you to generate images, and Notepad offers to rewrite your words. If your PC feels less like yours lately, you are not imagining it.
Here is the honest truth first: Microsoft says there is no single switch to remove all AI from Windows 11. But you can get very close. This guide shows two routes, the safe official one for most people, and a powerful open source script for those who want it all gone.
The 20-second version: Windows 11 has no official one click way to remove all AI. The safe route is to disable Copilot, online speech, and typing personalization in Settings, which Microsoft documents itself. For a deeper clean, the free open source RemoveWindowsAI script strips out Copilot, Recall, and hidden AI packages, and blocks them from returning after updates. Always back up first, and use the script’s Backup Mode so you can undo it.
1. The Honest Truth About Removing AI From Windows 11
Let us set expectations before you touch anything. When a user asked Microsoft’s own support community how to fully remove AI, an independent advisor replied plainly: officially, there is no way to remove the entire AI system. You can disable and uninstall the big pieces, but some AI stays baked into Windows.
So you have two realistic goals:
- Reduce AI to the bare minimum using built in Settings, which is safe and reversible.
- Strip out as much as technically possible using a third party script, which is more thorough but riskier.
Why this matters: Most people only need the first route. Turning off Copilot, online speech, and typing personalization handles the privacy worries that drive this search in the first place. Reach for the script only if you want a near total purge and you are comfortable running PowerShell as an administrator.
2. Method 1: The Safe Way Using Windows Settings
This is the route for almost everyone. It uses only built in options, so there is nothing to download and nothing to break. Microsoft documents every step below.
Turn Off and Uninstall Copilot
Step 1. Go to Start > Settings > Personalization > Taskbar, then turn off the Copilot toggle to hide it.
Step 2. Go to Settings > Apps > Installed apps, search for Copilot, click the three dots, and choose Uninstall. Do the same for Microsoft 365 Copilot if it is listed.
Turn Off Online Speech Recognition
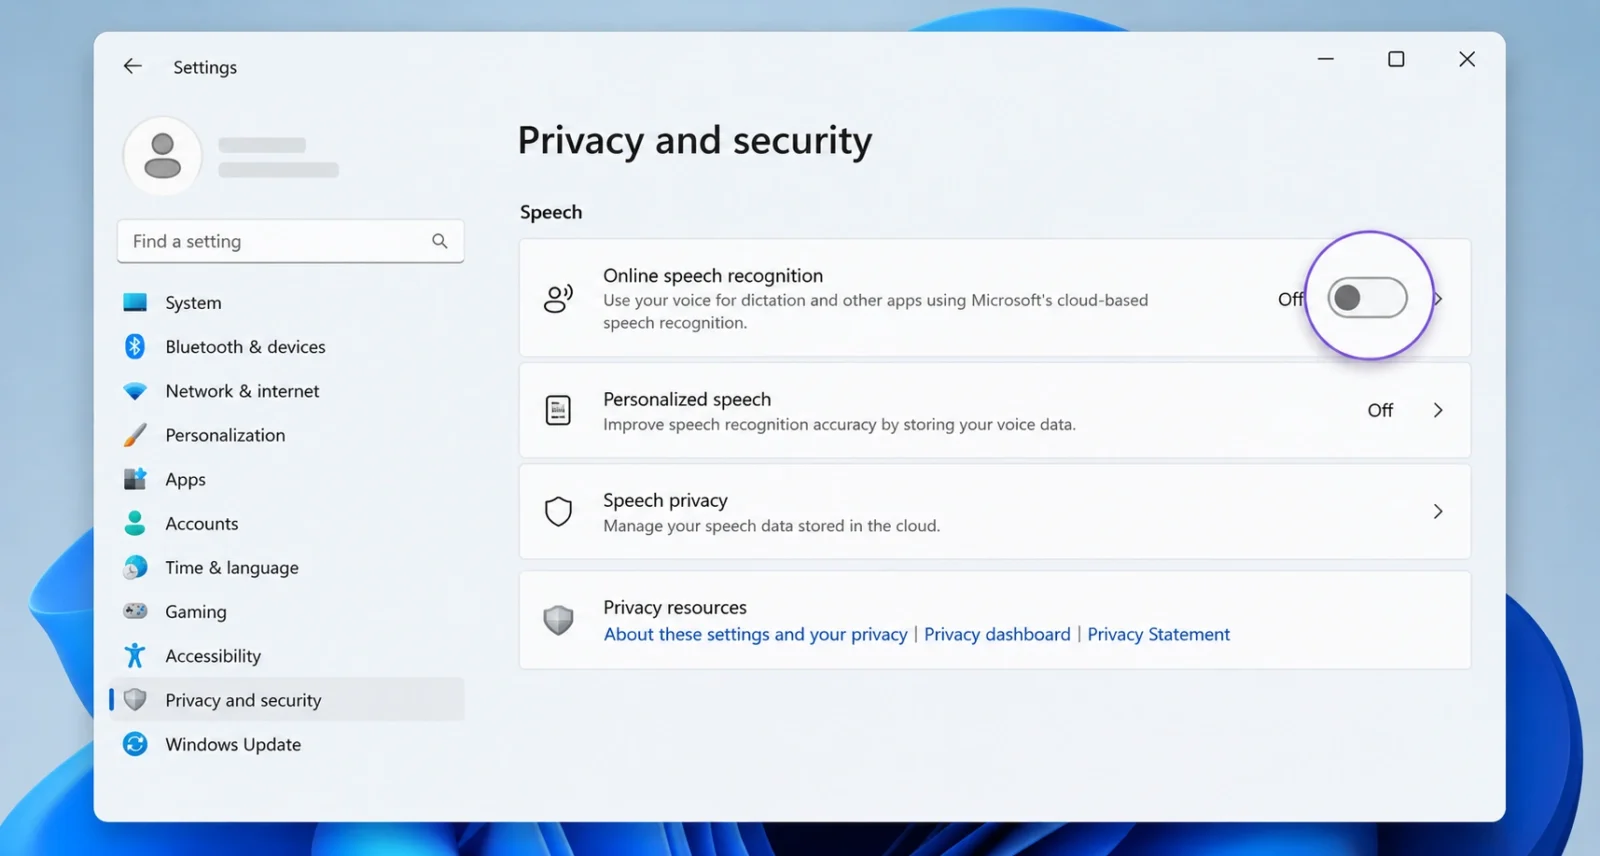
Step 3. Go to Settings > Privacy & security > Speech and set Online speech recognition to Off. This keeps speech processing on your device instead of the cloud.
Turn Off Inking and Typing Personalization
Step 4. Go to Settings > Privacy & security > Inking & typing personalization and turn off the custom word list. This also clears the word list Windows already built from your typing.
Tighten Search and General Privacy
Step 5. Go to Settings > Privacy & security > Searching Windows and narrow the indexing scope, for example to default folders only, so less of your PC is scanned.
Step 6. Still under Privacy & security, review General, Location, Diagnostics & feedback, and App permissions, and switch off anything you do not need.
Quick tip: You can also turn off Copilot inside Microsoft 365 apps separately. Microsoft has a dedicated guide for switching off Copilot in Word, Excel, and the rest, linked in the resources at the end.
3. Method 2: The Power User Way Using RemoveWindowsAI
Want more than Settings can offer? RemoveWindowsAI is a free, open source PowerShell script that targets the AI parts Microsoft does not let you remove through the menus. It has more than 10,700 stars on GitHub and is released under the open MIT license.
It can disable and delete Copilot across the system, Edge, Office, and gaming, remove Recall and its scheduled tasks, strip AI from Paint and Notepad, remove hidden AI packages, and even block them from reinstalling after a Windows update. Optionally, it can swap modern apps back to their classic versions.
Important safety notes: This script makes deep system changes. Create a restore point or backup first. Some antivirus tools flag it as a false positive, so you may need to allow it temporarily. If you are unsure, test it in a virtual machine before touching your main PC. Only run scripts you trust, and you can read the full source on GitHub.
How to Run It Step by Step
Step 1. Open Windows PowerShell 5.1 as Administrator. Click Start, type PowerShell, right click Windows PowerShell, and choose Run as administrator. Do not use PowerShell 7, since the author says it causes problems.
Step 2. Run the tool with Backup Mode on so you can fully revert later. Paste this and press Enter:
& ([scriptblock]::Create((irm "https://raw.githubusercontent.com/zoicware/RemoveWindowsAI/main/RemoveWindowsAi.ps1"))) -nonInteractive -backupMode -AllOptions |
Step 3. Prefer to pick options from a menu instead of removing everything? Run the interactive version and tick only what you want:
& ([scriptblock]::Create((irm "https://raw.githubusercontent.com/zoicware/RemoveWindowsAI/main/RemoveWindowsAi.ps1"))) |
Step 4. Let the script finish. It disables registry keys, removes AI packages, and cleans up leftover files. This can take a few minutes.
Step 5. Restart your PC so the changes settle and any lingering AI components clear out.
How to Undo It
Changed your mind? As long as you used Backup Mode, run the same script in revert mode from an admin PowerShell window:
<table width="624">
& ([scriptblock]::Create((irm "https://raw.githubusercontent.com/zoicware/RemoveWindowsAI/main/RemoveWindowsAi.ps1"))) -nonInteractive -revertMode -AllOptions</td>
Without Backup Mode, a full revert may not be possible, which is exactly why you turn it on before you start.
4. Which Method Should You Choose?
Here is a simple side by side to help you decide.
| Settings method | RemoveWindowsAI script | |
| How thorough | Disables the main AI features | Removes far more, including hidden parts |
| Risk level | Very low, fully reversible | Higher, needs backup and care |
| Skill needed | Beginner friendly | Comfortable with PowerShell |
| Survives updates | AI may return after updates | Can block reinstalls automatically |
5. The Nuclear Option: Switch to Linux
One commenter in Microsoft’s own thread suggested the most complete fix of all: leave Windows. A Linux distribution like Linux Mint ships with no built in AI and no background tracking, and it is far easier to install today than it used to be.
Most everyday Windows apps have solid alternatives, and you can run office software without any AI assist. It is a bigger leap than flipping a few toggles, but for privacy purists it removes the problem at the root. For most readers, though, Method 1 or Method 2 will be enough.
The honest caveat: Removing or disabling AI can affect features you might actually use later, like dictation or smart search. Nothing here is permanent if you keep a backup, but go in knowing the trade off. And remember the script is a third party tool, not a Microsoft product, so weigh that before running it on a work machine.
6. Will the AI Stay Gone After Windows Updates?
Not always with Method 1. Windows updates can quietly reintroduce Copilot and other AI features, so you may need to redo a toggle now and then.
Method 2 handles this better. The script can install an update block and a scheduled task that rechecks your system after each update and removes any AI that sneaks back. Even so, Microsoft ships new AI often, so check the project’s GitHub page for fresh versions from time to time.
Frequently Asked Questions
Can I completely remove all AI from Windows 11?
Not officially. Microsoft confirms there is no built in way to remove the entire AI system. You can disable and uninstall the major parts through Settings, and remove far more with a third party script, but some AI stays embedded in Windows.
What is the safest way to remove AI from Windows 11?
Use built in Settings. Hide and uninstall Copilot, turn off online speech recognition, disable inking and typing personalization, and tighten your privacy and search settings. These steps are reversible and need no downloads.
Is the RemoveWindowsAI script safe to use?
It is open source with a large user base, but it makes deep system changes. Back up first, enable Backup Mode, and consider testing in a virtual machine. Some antivirus tools flag it as a false positive, which the author notes is common for debloat scripts.
How do I undo the changes from the script?
Run the script in revert mode, but only if you originally ran it with Backup Mode enabled. Without Backup Mode, a full revert may not work, so always turn Backup Mode on before you start.
Will Windows updates bring the AI back?
They can, especially after the Settings method. The RemoveWindowsAI script can add an update block and a cleanup task that removes AI features again after updates, which helps keep them away.
Is there a way to avoid Windows AI entirely?
Yes, by switching to an operating system without it. A Linux distribution like Mint has no built in AI or background tracking and runs many Windows app alternatives, though moving away from Windows is a bigger commitment than changing settings.

