
You want off the Microsoft account. Maybe you are selling the laptop, maybe you value your privacy, or maybe you are just tired of signing into your own computer with a cloud login. Whatever the reason, there are three different jobs hiding inside that one request, and each needs a different fix.
Pick the one that matches your situation and jump straight to it.
| Your situation | What you need | Go to |
| I use a Microsoft account now and want my PC to use a local one instead | Switch existing account to local | Section 1 |
| I am setting up a brand-new or freshly reset PC and want to skip the account | Skip the account during setup | Section 3 |
| I want to delete someone else’s account, or a work account, from this PC | Remove a secondary account | Section 2 |
Before you switch, read this (60 seconds): If your PC uses BitLocker or device encryption (most modern laptops do), your recovery key is backed up to your Microsoft account right now. Switch to a local account without saving that key first, and a future firmware update can lock you out of your own files permanently. Section 4 shows you how to save it in two minutes. Do that first.
1. Switch Your Existing Microsoft Account to a Local Account
This is what most people actually want, and it is the easy one. Microsoft has tightened almost everything around local accounts, but this exact option has never gone away. Your files, apps, desktop, and even your user folder name all stay exactly where they are. You are only changing the login attached to them.
The Settings Method (Recommended)
- Open Settings with the Windows key plus I.
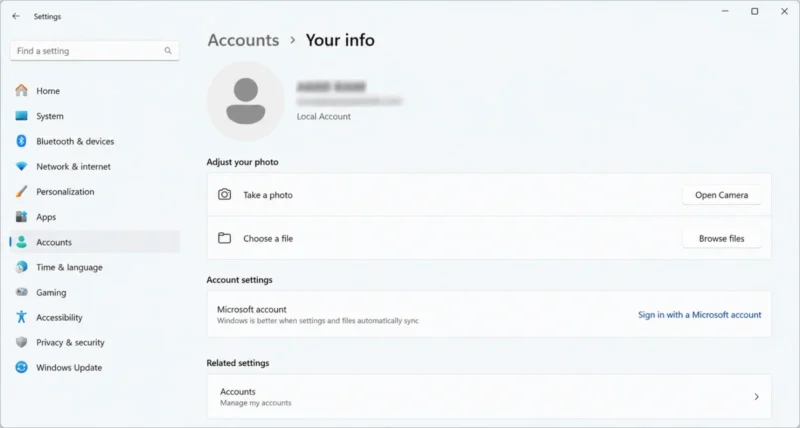
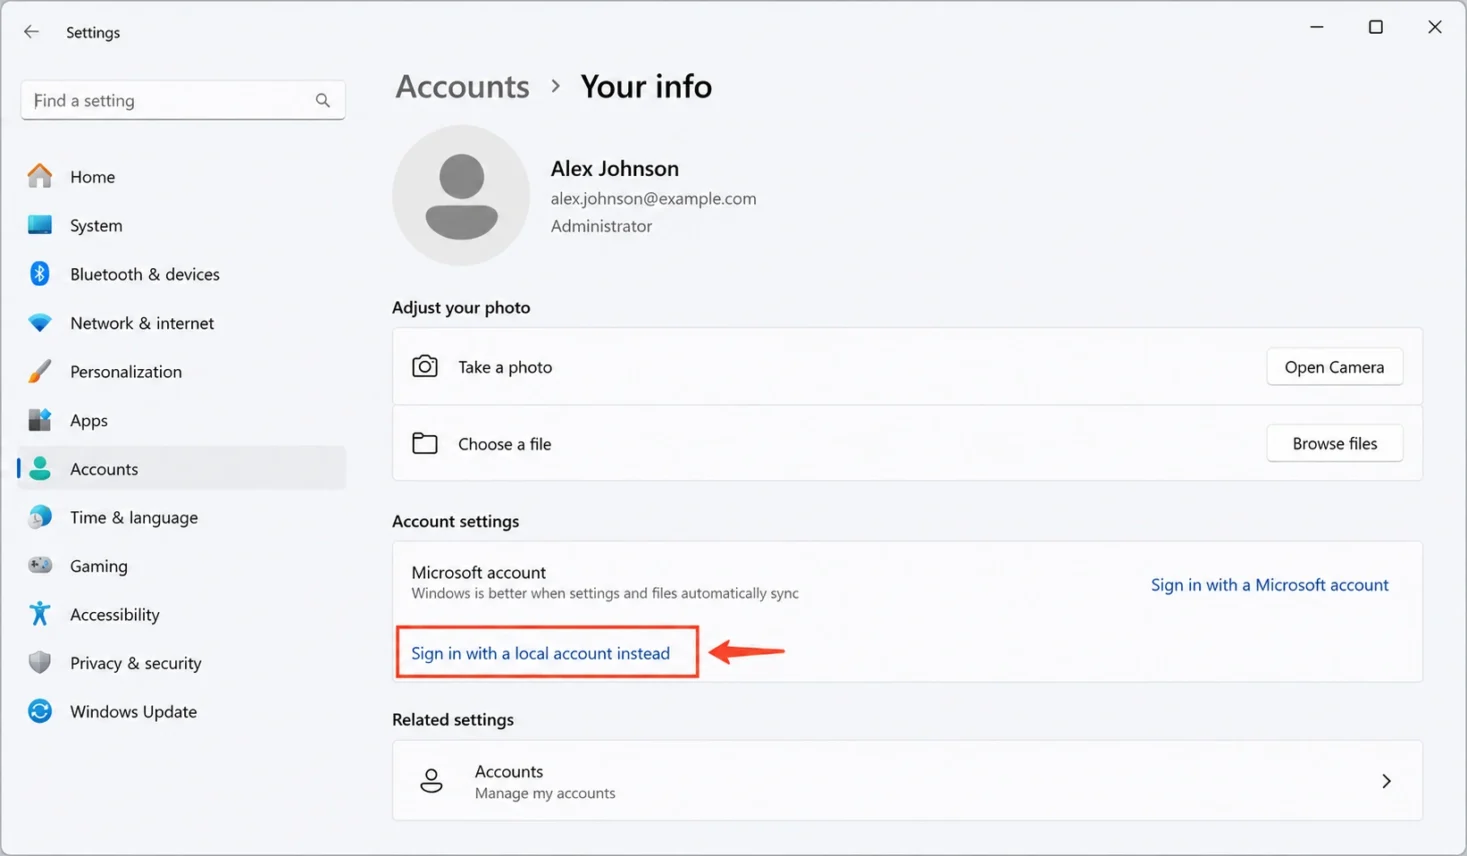
- Go to Accounts, then click Your info.
- Under Account settings, click Sign in with a local account instead. This link only appears when you are currently signed in with a Microsoft account.
- Click Next, then confirm your identity with your Microsoft account password or your Windows Hello PIN.
- Type a username, a password, and a password hint. The username has to be different from any other account on the PC.
- Click Next, then Sign out and finish. Sign back in with your new local account and you are done.
If the option is missing: Do not panic. The most common cause is that Windows Hello passwordless mode is on. Go to Settings > Accounts > Sign-in options and turn off For improved security, only allow Windows Hello sign-in for Microsoft accounts on this device. The local-account link comes back after that. If your PC is managed by a workplace or school, the option may be blocked by policy and you will need IT to remove it.
Want to Skip the Login Screen Entirely?
Switching to a local account still asks for a password at startup. If you want the PC to boot straight to the desktop, use the classic netplwiz trick after you have created your local account.
- Press Windows key plus R, type netplwiz, and press Enter.
- Select your account in the list.
- Uncheck Users must enter a user name and password to use this computer.
- Click Apply, type your password to confirm, then restart.
Checkbox not showing? On current Windows 11 builds this checkbox is often hidden until you turn off the Windows Hello-only setting mentioned above. Toggle that off, reopen netplwiz, and the checkbox reappears. One safety note: auto-login means anyone who opens your laptop is straight into your files. Only do this on a device that never leaves home.
2. Remove a Different Account From Your PC
This covers the other person’s account, an old account you no longer use, or a work or school account you want gone. The rules are simple: you have to be an administrator, and you cannot delete the account you are currently signed into. If you are trying to remove the only admin account, create another local admin first, sign into that, then come back.
Remove Another User’s Account
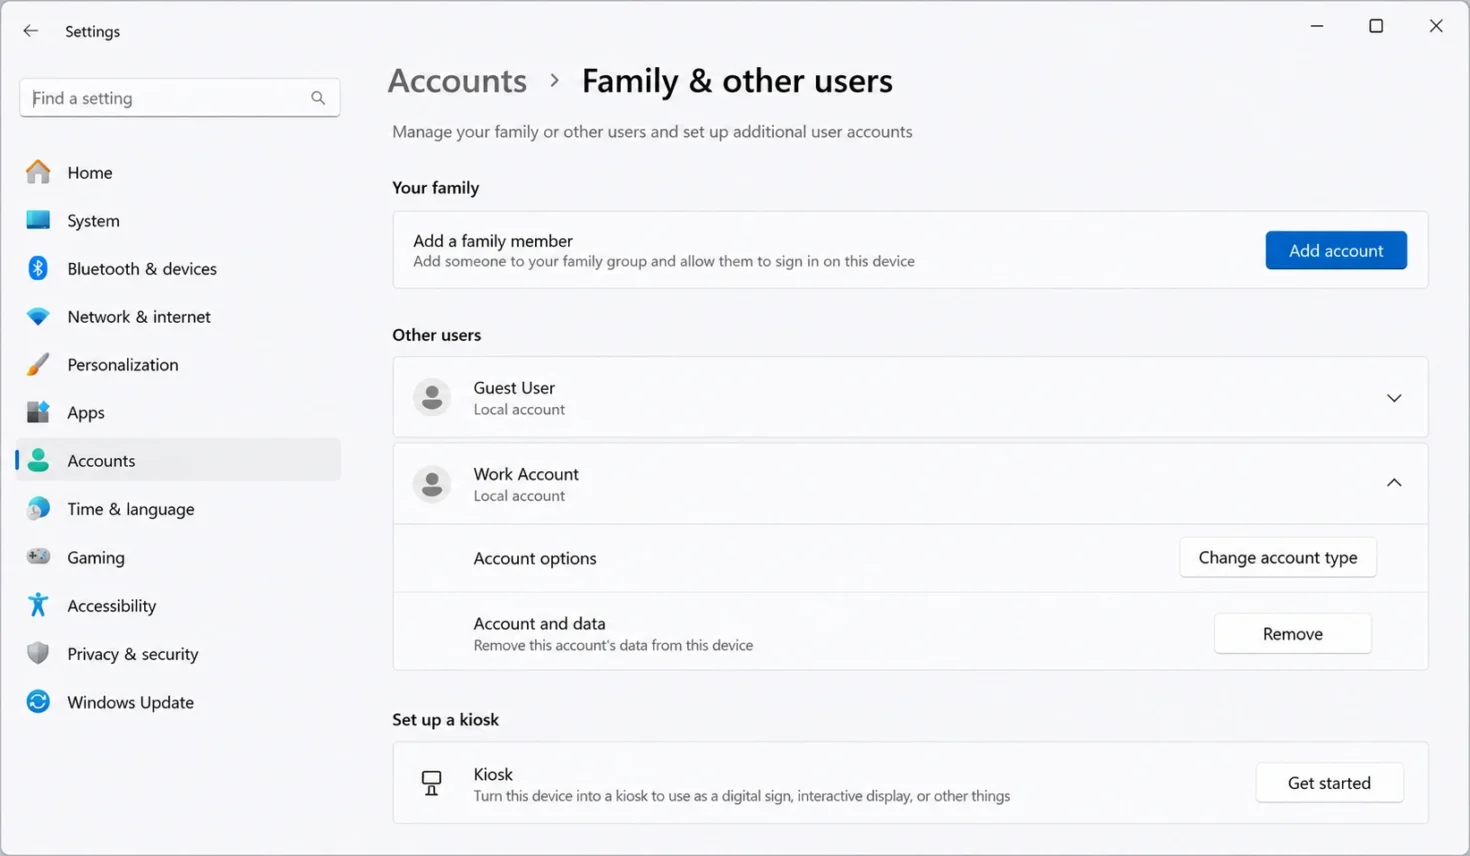
- Open Settings, go to Accounts, then Family & other users.
- Under Other users, click the account you want to remove.
- Click Remove, then Delete account and data.
Heads up: this deletes that user’s files, desktop, and documents on this PC. It does not delete their actual Microsoft account online, only their presence on this machine. Back up anything they need first.
Disconnect a Work or School Account
- Open Settings, go to Accounts, then Access work or school.
- Click the account, then click Disconnect.
- Reboot if prompted.
Disconnecting does not delete the work account itself. It removes the company sign-in and synced data from your device. If Disconnect is greyed out, your organization has locked it and only your IT team can release it.
Clear an App or Email Account
Some Microsoft accounts hang around inside apps like Outlook, Edge, or Office even after you switch your main login. To clear those:
- Go to Settings > Accounts > Email & accounts.
- Click the account, click Manage or Remove, then Delete account from this device.
3. Skip the Microsoft Account During Windows 11 Setup
This is the hard part, and it is a moving target. Microsoft has spent the last two years closing the loopholes that let you finish setup without signing in. The famous one-liners that every old tutorial recommends, bypassnro and ms-cxh:localonly, were both killed in the October 2025 update. So ignore any guide that has not been updated this year.
As of June 2026, here is what actually still works. Methods change with every Windows update, so treat this section as a snapshot and check the date on any guide you follow. Windows Central has tracked each crackdown in detail if you want the full history.
| Method | Works in 2026? | Best for |
| BypassNRO registry value | Yes, on current builds | Most people, no extra tools |
| Rufus install media | Yes, most reliable | Clean installs from a USB |
| Disconnect internet only | No longer enough alone | Combine with the registry method |
| bypassnro command | Mostly patched | Only old, un-updated media |
| Pro: Domain join instead | Yes, Pro and up only | Windows 11 Pro users |
Method A: The Registry Trick (Works on Most PCs)
You do this at the very first setup screen, before you connect to the internet. If you already passed that point, the cleanest fix is to reset the PC and start setup again.
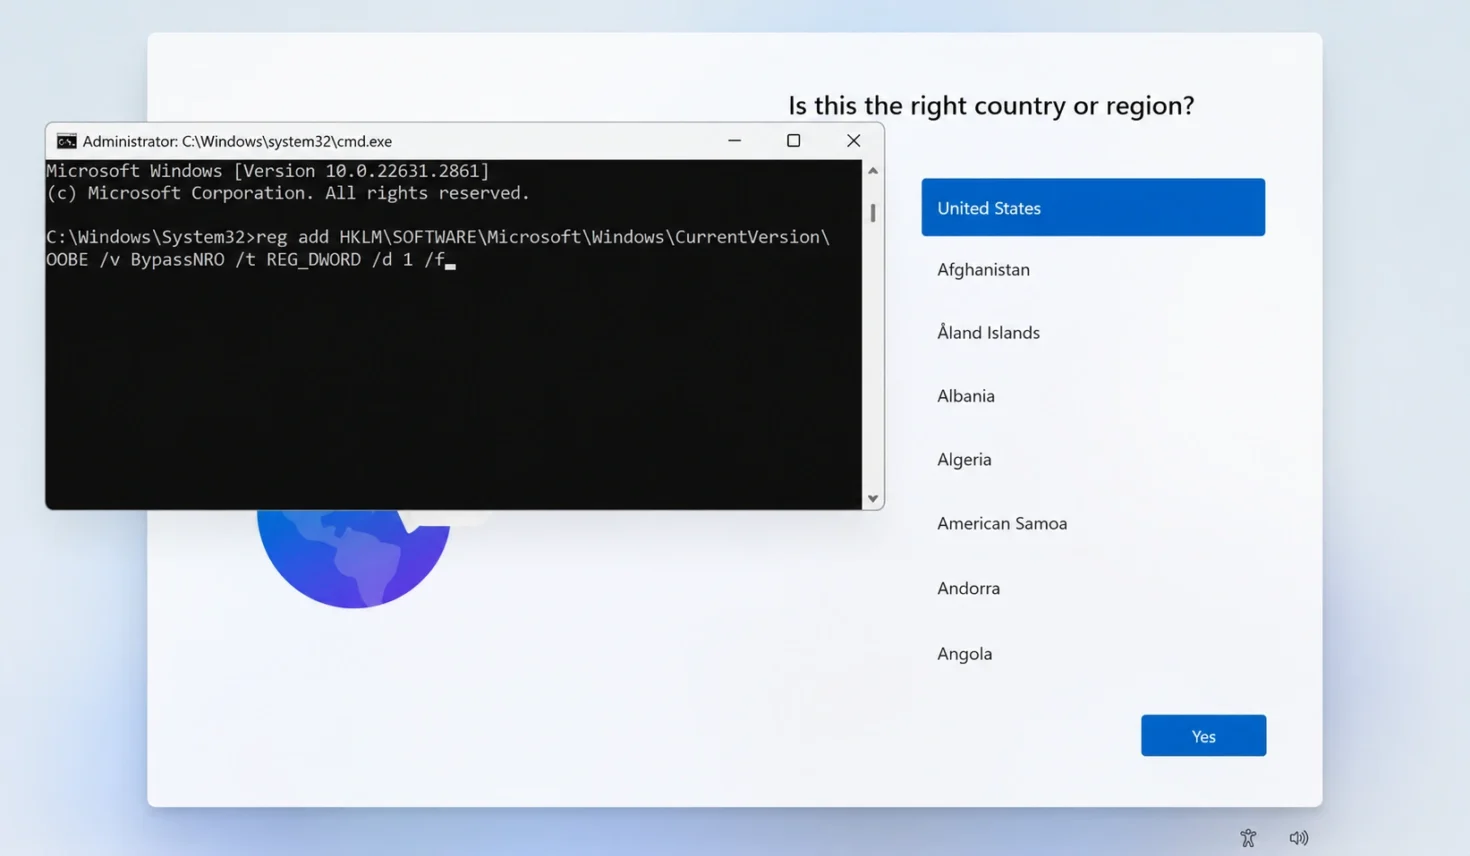
- At the first Windows 11 setup screen, press Shift plus F10 to open a command prompt.
- Type this command exactly and press Enter:
reg add HKLM\SOFTWARE\Microsoft\Windows\CurrentVersion\OOBE /v BypassNRO /t REG_DWORD /d 1 /f
- Then restart setup with this command:
shutdown /r /t 0
- When the PC reboots into setup, do not connect to WiFi. If you are on ethernet, unplug it.
- At the network screen, click I don’t have internet, then Continue with limited setup.
- Windows now lets you create a plain local account with a username and password. Done.
Method B: Rufus (The Most Reliable Way)
If you are doing a clean install from a USB drive, Rufus is the most bulletproof option because it edits the install image before Windows ever boots. The setup-screen crackdowns cannot touch it.
- Download the free, open-source Rufus tool (version 4.4 or newer) and a Windows 11 ISO from Microsoft.
- Open Rufus, select your USB drive and the ISO, then click START.
- In the Windows User Experience box that pops up, tick Remove requirement for an online Microsoft account.
- Finish writing the USB, boot from it, and install. Setup will let you create a local account directly.
Rufus can also tick boxes to skip the TPM and Secure Boot checks on older hardware in the same dialog, which is handy if you are reviving an older PC.
Method C: Domain Join (Windows 11 Pro Only)
On Windows 11 Pro, Enterprise, or Education, there is a built-in escape hatch with no commands at all. Windows 11 Home does not have this.
- At the account screen during setup, choose Set up for work or school.
- Click Sign-in options.
- Choose Domain join instead.
- Create a local username and password. Windows treats it as an offline account.
Reality check: Microsoft is clearly trying to make local accounts disappear during setup. Any of these methods could break with the next feature update (26H2 is expected around late 2026). If you depend on offline setup for many machines, the Rufus and answer-file routes are the most future-proof because they work outside Microsoft's setup flow.
4. The One Step Most Guides Skip: Save Your BitLocker Key
This is the part that can genuinely ruin your day, so it gets its own section. Modern Windows 11 laptops quietly turn on device encryption when you set them up with a Microsoft account. That account is where your 48-digit BitLocker recovery key lives. Cut the account loose without saving the key, and if a Windows or firmware update ever triggers a recovery prompt, you will be staring at a screen asking for a key you no longer have access to. Microsoft cannot recover it for you. The data is gone.
Save it first. It takes two minutes.
- Click Start, type BitLocker, and open Manage BitLocker.
- Next to your system drive, click Back up your recovery key.
- Choose Save to a USB flash drive, Save to a file, or Print the recovery key. Save it somewhere that is not the encrypted drive itself.
Already on a Microsoft account and want to grab the key online first? Sign in at account.microsoft.com/devices/recoverykey and copy down the 48-digit key for your device before you switch. We have a full walkthrough in our guide on finding your BitLocker recovery key.
Simplest safe order of operations: 1) Save your BitLocker key to a USB stick or print it. 2) Then switch to a local account. Never do it the other way around. If your laptop does not use encryption at all (check Settings > Privacy & security > Device encryption), you can skip this, but check rather than assume.
5. What You Actually Lose (and What You Don’t)
Switching to a local account is not all upside. Here is the honest trade, so nothing surprises you later.
| You keep | You lose |
| All your files and the same user folder | Settings and Windows Backup sync across devices |
| Installed apps and desktop programs | Automatic BitLocker key backup to the cloud |
| Browser profiles and bookmarks | Find My Device location tracking |
| The ability to switch back anytime | Smooth Microsoft Store purchases without a prompt |
| Local privacy, no cloud login | Your Windows Hello PIN resets, you re-create it |
Office and Microsoft 365 still work on a local account, though the apps may ask you to sign in separately to activate. None of this is permanent. If you miss the sync, you can reverse the whole thing in under a minute, which is the next section.
6. Changed Your Mind? Switch Back in a Minute
Going back to a Microsoft account is just as easy as leaving.
- Open Settings > Accounts > Your info.
- Click Sign in with a Microsoft account instead.
- Enter your Microsoft email and password, finish any two-step verification, then confirm your current local password when asked.
- Set or confirm a PIN if prompted. Your files and apps stay exactly as they were.
7. Why Microsoft Keeps Pushing the Account
It helps to understand the logic, because it explains why this keeps getting harder. Microsoft argues an account makes your device safer and fully set up: your BitLocker key is escrowed in the cloud, Windows Hello can be recovered, OneDrive backs up your files, and Copilot can personalize itself. Its official line on the 2025 crackdown was that the bypasses skip important setup screens and leave devices not fully configured.
Critics see it differently. A mandatory account ties your device to a real identity, boosts Microsoft’s cloud engagement numbers, and chips away at the idea that you fully control hardware you paid for. Both things are true at once. The good news is that for now, on your own PC, the choice is still yours to make.
Frequently Asked Questions
Can I use Windows 11 without a Microsoft account?
Yes. You can run Windows 11 entirely on a local account. You can switch an existing Microsoft account to local anytime through Settings > Accounts > Your info, and you can set up a new PC with a local account using the registry trick or Rufus. Microsoft makes the setup path harder each year, but it is still possible as of June 2026.
Does removing a Microsoft account delete my files?
Switching your own account to a local one keeps all your files, apps, and your user folder intact. You are only changing the login. However, removing a different person’s account with Delete account and data does erase that user’s files on the PC. And files stored only in OneDrive online may stop syncing, though they remain in the cloud.
Why is ‘Sign in with a local account instead’ missing?
The two usual causes are Windows Hello passwordless mode and a managed device. Turn off the setting at Settings > Accounts > Sign-in options that says only allow Windows Hello sign-in for Microsoft accounts, then the link reappears. If your PC is managed by a workplace or school, the option may be blocked and only IT can remove it.
How do I skip the Microsoft account during Windows 11 setup in 2026?
The old bypassnro and ms-cxh:localonly commands were patched out in October 2025. The methods that still work are the BypassNRO registry value (press Shift plus F10 at the first setup screen, add the registry key, restart, then choose I don’t have internet), or creating your install USB with Rufus and ticking Remove requirement for an online Microsoft account. Windows 11 Pro users can also use Domain join instead under Sign-in options.
Will the local account setup trick still work after the next update?
Maybe not. Microsoft has removed a different workaround roughly every six months. The registry method and the disconnect-internet step are the most likely to be patched. Rufus and answer-file installs are the most durable because they modify the install image before Windows setup runs. Always check the date on any guide you follow, including this one.
Is it safe to switch to a local account?
Yes, as long as you save your BitLocker recovery key first. That is the one real risk. Modern laptops encrypt the drive during Microsoft account setup, and the recovery key lives in that account. Save the key to a USB drive or print it before switching, and you remove the only serious danger.
Can I remove the only administrator account on my PC?
Not directly. Windows will not let you delete the account you are signed into, or the last administrator. Create a second local administrator account first at Settings > Accounts > Family & other users, sign into it, and then remove the original account from there.
What is the difference between a local account and a Microsoft account?
A Microsoft account is a cloud login (your Outlook, Hotmail, or Xbox email) that syncs settings, backs up your BitLocker key, and connects OneDrive and the Store across devices. A local account exists only on that one PC, with no cloud sync and no online login. Local accounts give you more privacy and control; Microsoft accounts give you more convenience and recovery options.

